Chromebooks are known for being simple, but their keyboards hide more functionality than most people realize. From backlit keys and hidden shortcuts to an on-screen keyboard that sometimes pops up uninvited, Chromebook keyboards work a little differently than what you’re used to on Windows or Mac. Whether you’re trying to turn on the backlight, fix a keyboard that’s suddenly typing the wrong letters, or just learn the shortcuts that make everyday tasks faster, this guide covers everything in one place. We’ll walk through setup, troubleshooting, cleaning, and brand-specific quirks so you can get the most out of your Chromebook’s keyboard without digging through scattered forum posts for answers.
What Is a Chromebook Keyboard? (Key Differences from Windows Keyboards)
A Chromebook keyboard looks familiar at first glance, but it’s built around ChromeOS rather than Windows or macOS, and that changes quite a bit about how it works. Instead of the usual function key row, you get a set of dedicated action keys for things like adjusting brightness, controlling volume, and switching between windows. There’s no Caps Lock key in the traditional sense either; it’s replaced by a Search or Launcher key that also opens the app drawer. These differences aren’t just cosmetic. They reflect how ChromeOS is designed to keep everything fast, cloud-based, and touch-friendly. Hence, the keyboard layout supports that experience rather than mimicking a desktop operating system, which it was never meant to replicate.
Chromebook Keyboard Layout Explained
The standard Chromebook layout uses a compact design, with a top row dedicated to system controls rather than F1 through F12. You’ll typically find keys for back, forward, refresh, full screen, window overview, brightness, volume, and power, all positioned where function keys usually sit. Below that, the layout resembles a typical QWERTY keyboard, though the bottom row often swaps the Windows key for the Search or Launcher key. Some models still include a physical Caps Lock in newer configurations, but most Chromebooks handle it through a key combination instead. Keyboard size and key spacing vary slightly by manufacturer, though the core layout logic stays consistent across nearly every Chromebook on the market today.
Unique Keys You Won’t Find on a Regular Keyboard
Chromebooks include a handful of keys that simply don’t exist on Windows or Mac keyboards, and knowing what they do makes daily use much smoother. The Everything button, often labeled with a circular icon, opens the launcher and search bar with a single press. The Overview key shows all open windows at once, functioning like a built-in task switcher. There’s also a dedicated screenshot key on many newer models, removing the need for awkward key combinations. Older Chromebooks may lack this and instead rely on Ctrl+Shift+Windows. These keys exist because ChromeOS prioritizes quick navigation and multitasking, so the keyboard is designed to support that workflow directly rather than borrowing shortcuts from other operating systems.
How to Turn On and Use the Backlit Chromebook Keyboard
Not every Chromebook comes with a backlit keyboard, but on models that do, turning it on is usually a quick fix once you know where to look. The backlight is designed to help you type in low-light conditions, and most manufacturers make it accessible either via a dedicated key or a quick-settings toggle. If your keys aren’t lighting up, the first step is to confirm your model actually supports backlighting, since budget- and education-focused Chromebooks often skip this feature entirely. Once confirmed, enabling it takes just a few seconds, and adjusting brightness afterward lets you fine-tune it to match your environment.
Turning On Keyboard Lights on a Chromebook (Step-by-Step)
To turn on the Chromebook keyboard backlight, look for a key with a backlight icon, usually located in the top row alongside brightness and volume controls. Pressing it toggles the light on or off, and on some models, holding it briefly cycles through brightness levels. If there’s no dedicated key, check your quick settings panel by tapping the clock in the bottom-right corner, then look for a keyboard backlight option in the expanded menu. On Chromebooks without a visible toggle, the backlight may automatically activate in low ambient light via a built-in sensor, so there’s nothing extra to configure.
Adjusting Keyboard Backlight Brightness
Once your Chromebook keyboard backlight is on, you can usually adjust its intensity through the same settings panel used to enable it. Some models offer multiple brightness levels you cycle through with repeated key presses, while others provide a slider in system settings for more precise control. Lower brightness settings help conserve battery life, which matters if you’re working away from a charger for extended periods. If the brightness seems fixed and won’t change, your specific model may only support a single on/off state rather than variable lighting levels.
Chromebooks Without Backlit Keyboards
If you’ve searched every settings menu and still can’t find a way to enable the backlight, your Chromebook keyboard likely doesn’t include this feature at all. Backlighting is typically reserved for mid-range and premium Chromebook models, while entry-level and education-focused devices typically omit it to keep costs down. There’s no software workaround for this, since it depends entirely on the keyboard’s physical hardware. If backlighting is a priority for you, checking the specifications before purchasing is the only reliable way to confirm whether a particular Chromebook model supports it.
Using the On-Screen Chromebook Keyboard
The on-screen keyboard is a built-in accessibility feature that lets you type without a physical keyboard attached, which is especially useful on touchscreen Chromebooks or convertible models used in tablet mode. It mirrors a standard keyboard layout on your display and responds to taps just like a smartphone keyboard would. While it’s helpful in the right situations, it can also become an annoyance if it activates when you don’t need it, especially when a physical keyboard is already connected. Knowing how to toggle it on or off gives you control over when it appears.
How to Enable the On-Screen Chromebook Keyboard
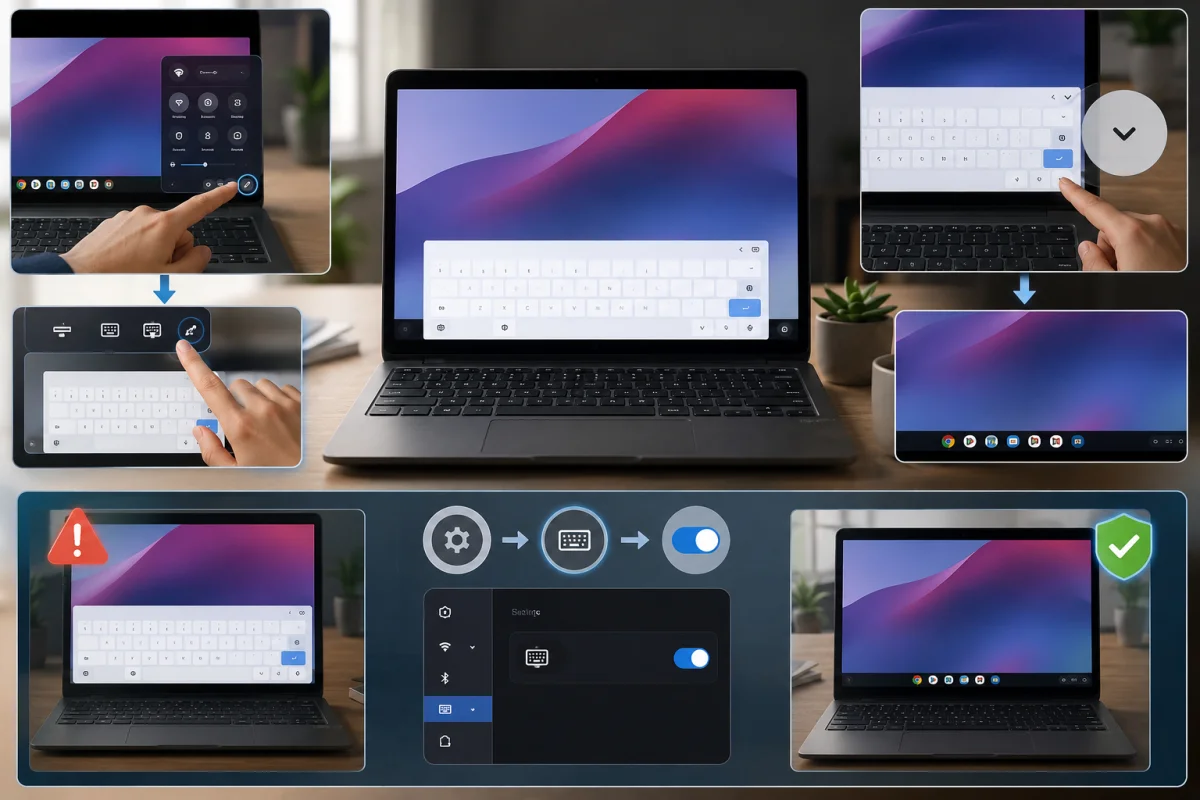
To turn on the on-screen keyboard, open Settings, then navigate to Accessibility and select Manage Accessibility Features. Under the Keyboard and Text Input section, toggle on the option labeled “Enable on-screen keyboard.” Once activated, it appears automatically whenever you tap into a text field, such as a search bar or document. This is particularly useful for touchscreen Chromebooks used without a physical keyboard nearby, or for anyone who prefers tapping over typing for short tasks like quick searches or messages.
How to Turn Off the On-Screen Chromebook Keyboard
If the on-screen keyboard keeps appearing and you’d rather type with a physical keyboard, turn it off by going to Settings > Accessibility > Manage Accessibility Features. Simply switch off the “Enable on-screen keyboard” toggle, and it will stop appearing when you tap into text fields. Some users only need it occasionally, so rather than disabling it entirely, you can ignore it, since it won’t interfere with physical keyboard input even when both are technically active.
Fixing the On-Screen Chromebook Keyboard Popping Up Unexpectedly
When the on-screen keyboard appears on its own even though you’re using a physical keyboard, it’s usually because accessibility settings were enabled accidentally or a touchscreen input is being misread as a tap. Start by checking Settings> Accessibility to confirm whether the feature is enabled without your knowledge. If it’s off but still appearing, try restarting your Chromebook, since a temporary software glitch can sometimes cause this behavior. Persistent issues after a restart may indicate a touchscreen calibration problem that warrants separate investigation.
Essential Chromebook Keyboard Shortcuts
Shortcuts are where the Chromebook keyboard really shines, letting you skip menus entirely for tasks you do dozens of times a day. Because ChromeOS replaces the traditional function row with dedicated action keys, many shortcuts work differently from what Windows or Mac users are used to. Learning a handful of core combinations can noticeably speed up everyday browsing, multitasking, and system control, especially once they become second nature.
Screenshot and Screen Recording Chromebook Keyboard Shortcuts
On newer models with a dedicated screenshot key, pressing it once opens a menu to capture the full screen, a partial area, or start a screen recording. On Chromebooks without this key, the same result can be achieved by pressing Ctrl+Shift+Windows, which opens the capture menu. Screenshots are saved automatically to your Files app under the Screenshots folder, and a quick preview appears in the corner right after capture, letting you annotate or delete it before it’s saved permanently.
Window and Tab Management Chromebook Keyboard Shortcuts
Managing multiple windows and tabs becomes much faster once you know the right combinations. Alt plus Tab switches between open windows, while Ctrl plus Tab cycles through open tabs within the same browser window. Pressing the Overview key displays all open windows at once, making it easy to jump straight to the one you need. To split your screen between two windows, drag one to the left or right edge to snap it into place, or press Alt + the bracket keys to resize and reposition windows without touching the trackpad.
Restart, Shutdown, and Lock Screen Chromebook Keyboard Shortcuts
To restart your Chromebook using only the keyboard, press Ctrl+Shift+Q twice in quick succession, which signs you out and returns you to the login screen, or hold the Power button briefly to display a full restart prompt. Fully shutting down is done by pressing and holding the Power button until the device turns off, since ChromeOS doesn’t offer a dedicated keyboard-only shutdown shortcut. To lock your screen quickly, press the Search key plus L, which is especially useful when stepping away from a shared or public device.
Copy, Paste, and Text Editing Chromebook Keyboard Shortcuts
Standard text editing shortcuts carry over from other platforms, so Ctrl plus C copies, Ctrl plus V pastes, and Ctrl plus X cuts selected text. For pasting without formatting, Ctrl+Shift+V strips out fonts and styling, which is handy when copying and pasting from web pages into plain documents on a laptop. Undo and redo work through Ctrl plus Z and Ctrl plus Shift plus Z, while Ctrl plus A selects all text or items in the current window, matching behavior you’d expect from any standard keyboard.
Debugging and Developer Chromebook Keyboard Shortcuts
For users working in developer mode or troubleshooting system issues, Ctrl+Alt+T opens the Crosh shell, a terminal-like interface for running diagnostic commands. Ctrl+Shift+I opens the browser’s developer tools to inspect web page elements and scripts. These shortcuts are less commonly needed for everyday use but become essential for anyone doing web development, IT support, or advanced system troubleshooting directly from ChromeOS.
Changing Chromebook Keyboard Language and Settings
Beyond shortcuts and backlighting, the Chromebook keyboard also supports a range of language and input customizations that many users never explore. Whether you’re switching between multiple languages, typing special characters, or troubleshooting a layout that doesn’t match your region, these settings are all in one central location and easier to manage than you might expect.
How to Switch Chromebook Keyboard Language
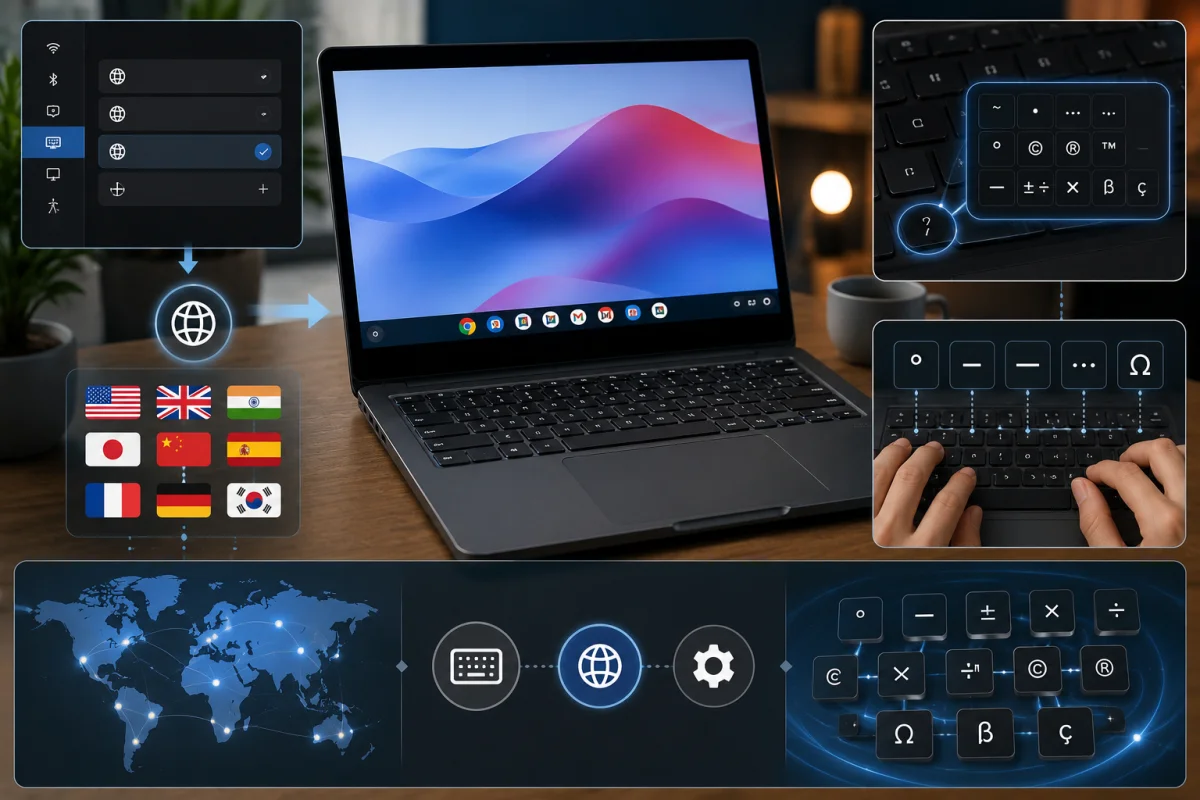
To change your keyboard language, open Settings, then go to Advanced, followed by Languages and Inputs. Under Inputs, click “Add input methods” and select the language you want to add. Once added, you can switch between installed languages using the keyboard shortcut Ctrl+Space or by clicking the input method icon in the system tray at the bottom right. This is particularly useful for bilingual users or anyone typing in a language with a character set different from English.
Typing Special Symbols on a Chromebook Keyboard (Degree Sign, Em Dash, and More)
Special characters that aren’t visible on the keys are still accessible through a few methods. The degree symbol can be typed using Shift plus the key with the ring icon on some international layouts, or through the built-in emoji and symbol picker accessed with the Search key plus Shift plus Space. For an em dash, opening the same symbol picker and searching “em dash” is usually the most reliable route, since there’s no direct key combination for it on standard US layouts. The symbol picker covers most special characters you’d otherwise need to copy and paste from a web page.
Fixing International Chromebook Keyboard Layout Issues
If your keys are producing the wrong characters, it’s often because the wrong input method or physical keyboard layout is selected. Head back to Settings, then Languages and Inputs, and confirm the input method matches your actual keyboard’s printed layout. Mismatches commonly occur with international or replacement keyboards, where the physical keys don’t correspond to the default US layout that ChromeOS may have selected automatically. Selecting the correct layout under Inputs usually resolves the issue immediately without needing a restart.
Troubleshooting a Chromebook Keyboard That’s Not Working
A Chromebook keyboard that suddenly stops responding is one of the most common issues users run into, and thankfully, most cases trace back to a small number of causes that are fairly easy to diagnose. Before assuming a hardware failure, it’s worth working through a few basic checks, since software glitches and accidental settings changes are often the real culprits behind keys that won’t type.
Common Causes of a Chromebook Keyboard Not Working
The most frequent causes include a frozen system process, a pending software update, debris trapped under the keys, or a Bluetooth keyboard that’s lost its connection if you’re using an external one. Restarting the Chromebook resolves a surprising number of these cases by clearing temporary glitches that can interfere with keyboard input. If the issue started right after a system update, checking for a further update or reporting the bug through ChromeOS feedback tools can help if it’s a known issue affecting other users.
Chromebook Keyboard Typing the Wrong Letters
When keys produce characters different from those expected, the cause is almost always a language or input method mismatch rather than a hardware fault. Revisiting the Languages and Inputs settings and confirming the correct keyboard layout is selected typically fixes this right away. In rare cases, a stuck key combination like Caps Lock or an accidentally enabled alternate input method can also cause this, so toggling those off is worth checking if the layout itself is already correct.
Chromebook Keyboard Not Working But Touchscreen Is Fine
If the touchscreen and trackpad respond normally but the keyboard doesn’t, this points to a driver or firmware issue rather than a full system failure. Restarting the device is the first step, followed by checking for pending ChromeOS updates under Settings, then About ChromeOS. If neither resolves it, powerwashing the device as a last resort can clear deeper software conflicts. However, this should only be done after backing up any local files, since it resets the Chromebook to factory settings.
How to Unlock a Locked Chromebook Keyboard
A keyboard that seems “locked” is usually caused by an accidental setting rather than an actual lock feature, since ChromeOS doesn’t include a dedicated keyboard lock. Check whether Accessibility features like Sticky Keys or an on-screen keyboard override are enabled, as these can sometimes make the physical keyboard feel unresponsive. Restarting the device also clears most temporary input freezes that can mimic a locked keyboard.
When to Repair vs. Replace a Chromebook Keyboard
If physical keys are missing, cracked, or consistently unresponsive even after software troubleshooting, the issue is likely hardware-related and requires repair or replacement. For Chromebooks still under warranty, contacting the manufacturer is the safest first step, since opening the device yourself can void coverage. Out-of-warranty devices can often have their keyboard replaced by a local repair shop or through a DIY replacement kit, though this is generally only cost-effective on higher-end models, since budget Chromebooks are sometimes cheaper to replace outright than repair.
Testing Your Chromebook Keyboard
Before assuming a keyboard issue is serious, run a quick test to confirm exactly which keys are affected and whether the problem is isolated or widespread. Testing is also useful after a repair or replacement, giving you a simple way to verify every key registers correctly before considering the job done.
Built-In Chromebook Keyboard Test Tools
ChromeOS includes a diagnostics app that can check hardware components, though its keyboard-specific testing is limited compared to dedicated tools. To access it, search for “Diagnostics” in your app launcher; this opens a panel that covers checks for battery, CPU, memory, and connectivity. For keyboard-specific testing, most users instead rely on the Crosh shell by pressing Ctrl+Alt+T, though this is better suited to advanced users comfortable with command-line tools than to a simple visual key-by-key test.
Third-Party Chromebook Keyboard Testers
For a straightforward visual test, web-based keyboard testers work well on Chromebooks since they run directly in the browser without needing an installed app. These tools display an on-screen keyboard layout that highlights each key as you press it, making it easy to spot unresponsive or malfunctioning keys at a glance. They’re particularly useful for confirming a full keyboard replacement was successful, since you can quickly cycle through every key rather than testing them individually while typing normally.
Cleaning and Maintaining Your Chromebook Keyboard
Regular cleaning keeps a Chromebook keyboard responsive and extends its lifespan, since dust, crumbs, and debris are common culprits behind sticky or unresponsive keys over time. A few simple habits go a long way toward preventing the kind of buildup that eventually leads to hardware issues.
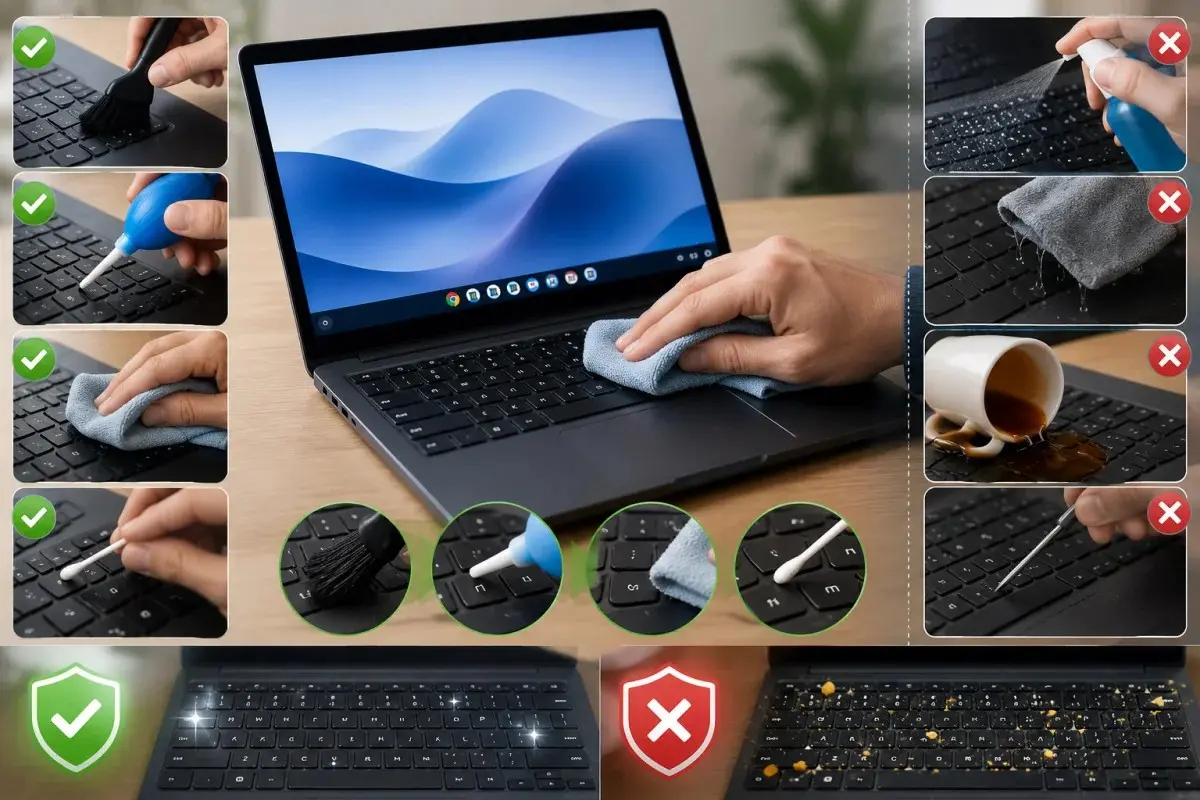
Safe Ways to Clean a Chromebook Keyboard
Start by powering off the Chromebook completely before cleaning to avoid accidental key presses or short circuits. Turn the device upside down and gently shake it to dislodge loose debris, then use a can of compressed air to blow out particles trapped between and beneath the keys. A soft-bristled brush, like a clean makeup brush, works well for loosening dust in tighter spaces. For the keys themselves, a microfiber cloth lightly dampened with isopropyl alcohol removes grime and fingerprints without leaving moisture behind.
What to Avoid When Cleaning a Chromebook Keyboard
Never spray liquid cleaners directly onto the keyboard, since moisture can seep beneath the keys and damage the internal circuitry. Avoid using excessive force with compressed air at close range, as it can sometimes push debris further into the keyboard rather than out. Skip household cleaning wipes containing bleach or ammonia, since these can degrade the key coating and cause discoloration over time. If you’re ever unsure whether a cleaning method is safe, checking the manufacturer’s specific guidance for your model is the safer route.
Chromebook Keyboards by Brand
While the core layout stays fairly consistent across ChromeOS devices, individual manufacturers add their own touches to key aspects such as spacing, materials, and build quality. Knowing what to expect from each major brand can help if you’re troubleshooting a specific model or deciding what to look for in your next Chromebook.
Dell Chromebook Keyboards
Dell Chromebook keyboards are known for solid tactile feedback and slightly firmer key travel than some competitors, which many users find comfortable for extended typing sessions. Models like the Dell Chromebook 11 and Chromebook 3100 use a fairly standard layout, though spill-resistant designs are common across the lineup, adding durability for school and business use. Dell also tends to include backlighting on select higher-tier models rather than across the entire lineup.
Lenovo Chromebook Keyboards
Lenovo Chromebook keyboards, including those found on the popular 300e series, are often built with education and rugged use in mind, featuring reinforced keys designed to withstand heavier daily wear. The layout follows the standard ChromeOS format, and many Lenovo models in this line prioritize durability over premium typing feel, which makes sense given their frequent use in classroom settings. Higher-end Lenovo Chromebooks outside the education line tend to offer a more refined typing experience.
HP Chromebook Keyboards
HP Chromebook keyboards typically feature a comfortable, slightly rounded key design, and backlighting is more common across HP’s Chromebook lineup than in some other brands. When HP Chromebook keyboards stop working, it’s often due to the same software issues common across all Chromebooks. However, HP’s diagnostic tools in Settings can sometimes flag hardware-specific issues more clearly than ChromeOS’s generic diagnostics.
Asus and Acer Chromebook Keyboards
Asus Chromebook keyboards are frequently found on convertible and 2-in-1 models, so their key layout is often optimized to work well alongside touchscreen and tablet mode functionality. Acer Chromebook keyboards, meanwhile, are common across a wide range of budget-to-mid-tier devices, and Acer also offers keyboard replacement parts widely, making repairs more accessible for out-of-warranty devices than for some competing brands.
External Keyboards and Accessories for Chromebooks
Not everyone wants to rely solely on the built-in keyboard, and ChromeOS supports external options for those who prefer a different typing experience or need added protection for daily use.
Best External Keyboards for a Chromebook
Most Bluetooth and USB keyboards work seamlessly with a Chromebook external keyboard setup, since ChromeOS supports standard HID (Human Interface Device) protocols without requiring special drivers. Compact mechanical keyboards are popular among users seeking tactile feedback beyond what a laptop keyboard offers, while slim, portable Bluetooth options suit anyone who uses their Chromebook on the go. When pairing one, a few Chromebook-specific keyboards are also available that map Chrome OS shortcuts directly to dedicated keys, closely mirroring the built-in layout.
Keyboard Covers: Are They Worth It for a Chromebook Keyboard?
A Chromebook keyboard cover is a thin silicone layer that fits directly over the keys, protecting against spills, dust, and general wear without significantly affecting typing feel. They’re especially useful in classroom or shared-device settings where multiple users handle the same Chromebook throughout the day. The trade-off is a slightly softer key-press feel, which some users adjust to quickly, while others find it distracting during long typing sessions. For anyone prone to spills or working in dusty environments, the protection they offer usually outweighs the minor difference in typing feel.
Frequently Asked Questions
How many keys does a Chromebook keyboard have?
Most Chromebook keyboards have between 78 and 84 keys, depending on the model and region, which is slightly fewer than a standard Windows keyboard, since most models lack a dedicated function row or numeric keypad.
Why is my Chromebook keyboard not working?
The most common causes are a temporary software glitch, a pending update, or an incorrect language and input setting, all of which are usually resolved with a restart or a quick check of your Languages and Inputs menu.
How do I permanently turn off the on-screen keyboard?
Go to Settings, then Accessibility, then Manage Accessibility Features, and toggle off “Enable on-screen keyboard” so it no longer appears automatically when you tap into text fields.
Can I use a Windows keyboard on a Chromebook?
Yes, most standard USB or Bluetooth Windows keyboards work fine on a Chromebook, though a few keys like Caps Lock and the Windows key won’t map to ChromeOS-specific functions like the Launcher or Overview key.